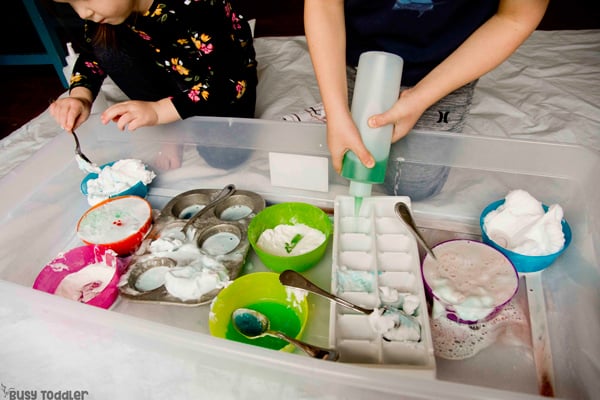
Ready to have some science fun? Let’s make some potions!
Mixing, pouring, stirring, experimenting… anyone else remember just testing things out as a kid? Pouring together different liquids to see what will happen and probably making a giant mess in the process?! Well, it’s time for the table to turn and to let your kids be the ones making potions.
RELATED: Curious how I teach my kids each day? Check out Playing Preschool!

How do you start making potions?
You get a lot of fun liquids together and let the kids mix and match!
But first…
Get your game face on, because this is going to get crazy.
This is what I call a controlled mess.

I’m deciding to make a mess.
I’m deciding we will do this.
I’m in full control over the mess that’s about to happen.
That’s very very different than the kids just going nuts and I’m left to pick up the pieces.
RELATED: Need some more science fun? Here’s my all time favorite science activity.

Have a game plan. Here’s mine.
I started with a tarp.
It’s not actually tarp but a shower curtain liner that I got for about $5. You can also find them at the dollar store for (obviously) even cheaper.
I use this to catch the spills, to make things easy to contain, and because I can just toss this in the wash at the end.

Next, I grabbed my biggest storage container – a 41 quart under-the-bed style tub that’s perfect for giant activities like this.
RELATED: Love this idea to make potions? My friend at Friends Art Lab has fun like this all the time!

And now for making potions…
Here’s what I put in for potion making:
Busy Toddler is a participant in the Amazon Services LLC Associates Program, an affiliate advertising program. As an Amazon Associate, I earn from qualifying purchases. Read more about these links in my disclosure policy.
- Shaving cream
- Baking soda (bicarbonate)
- Vinegar
- Dawn dish soap (washing up liquid / fairy soap)
- Food coloring – just for me to use
- Plastic bowls
- Muffin tins
- Ice cube trays
- Squeeze bottles – if you don’t have these, use squeezable water bottles
**please note that this activity is NOT taste safe and some materials may irritate eyes. Use good judgement when deciding if your child is ready for this activity**

THIS WAS AWESOME
I left the activity really open to the kids (both 4 years old) to just mix and measure and experiment.
They were fully immersed in science and learning exactly what it’s like to do experiments.

A few tips:
- Dilute the vinegar with water – it’ll still react with the baking soda but it’ll last longer. I also added food coloring to it.
- Give each kiddo a wet wash cloth so they can easily clean up some of the messes.
- Be willing to add additional food coloring to make the experiments more exciting. I did this and they loved it.

Remember what the goal is of this activity…
The goal is open-ended experimenting.
And to just let them investigate and play with the materials to see what happens on their own.
There’s so much learning that can happen when we just back away and let kids develop without any interfering.

Making potions was EPIC
It was an epic 45 minute event. It was an epic amount of fun. It was an epic experimenting time.
We will make potions again – I know we will. This is one activity that needs to be repeated and repeated often.

And truth time: it ended up not being that big a mess!
All that fuss for nothing!
What will your kids think of making potions?


 Subscribe to my free newsletter and I’ll send you “35 Easy Toddler Activities to Break Up the Day!”

Leave a Comment